DIY: CO2 Generator
The purpose of a DIY CO2 generator is to provide a carbon source for plants to thrive, while on a budget. Adequate light in conjunction with CO2 injection will enable plants to photosynthesize at or near optimal levels. The increased vigor of your plants as a consequence of this will be observed not only in their increased rate of growth but also in streams of oxygen bubbles being released from the leaves (pearling). In turn, your fish will benefit from the increased oxygen concentration and the cleaner water produced by the plants.
Ready to get started? Here's what you will need:
- 2 Liter soda bottles x2
- 1 Small bottle to act as a bubble counter
- 1/4 Air line tubing (silicone tubing is better)
- 1/4 Air line tee
- 2 Check valves
- Super glue
Let's start with the soda bottles. Make sure they are clean. Simply rinse them out with hot tap water. Drill out both of the caps with a drill bit slightly smaller than the tubing. This will ensure a tight fit to help prevent CO2 from leaking out.

Now that you have made the hole in the caps, let's move on to the silicone tubing. Cut the tubing at an angle so its easier to push/pull it through the hole in the cap, leaving the tubing about 1/2 inch past the cap. You want to leave a good length of tubing on each one. 1-1/2 feet should be sufficient.
Optionally, you may wish to use a bit of silicone, super glue, or even PVC cement to seal the reactor chamber. Repeat the process on the inside of the cap as well, and let it dry.
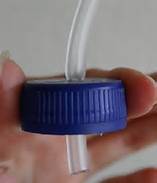
Lets work on the bubble counter now, I like to use small plastic juice bottles, but you can use almost anything that you can see into clearly. On this cap you will need two holes, as shown here. Just like in the previous step, be sure to seal both sides of the cap to prevent any leaks.
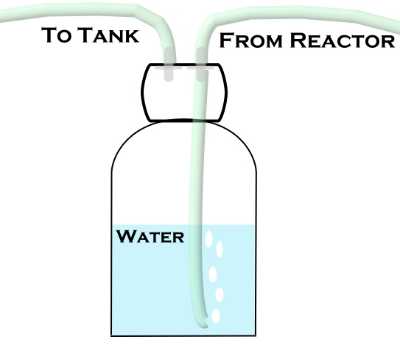
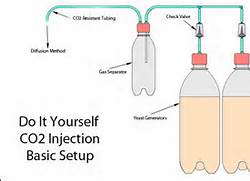
You will need to fill the bottle for the bubble counter about half way with water so that you can see the CO2 bubbles. Connect all of the bottles and check valves as in the picture, and you are ready for making the mix.

There are many recipes for DIY CO2. A good starting recipe per 2-liter bottle is:
- 2 cups of sugar
- 1 tsp. of bakers yeast (Brewers or wine yeast will last longer)
- 1 tsp. of baking soda
In each 2 liter bottle, pour in your sugar. Fill the bottle about half way with warm (not hot) water. Shake it until the sugar is dissolved. Once all of the sugar is dissolved, add your yeast baking soda. Fill the bottle with cold water up to the curve of the bottle. Screw caps on tight.
Each bottle will last roughly 2 weeks. To produce a more constant rate of bubbles, alternate your bottles weekly.
There are many ways to diffuse the CO2 into the tank. Diffusing chops up the bubbles, making them smaller, allowing for better absorption into the water. If you have a canister filter, you can just push the tubing into the intake and let the filter diffuse the bubbles of CO2. You can also use an air stone, CO2 ladder, or you can build a CO2 reactor.